Dynamics 365 F&O Integration Case Study: Part II
The “Middleware”⌗
Introduction⌗
In the previous entry, I went over the source systems including Microsoft Dynamics and the database that sits under it. Due to it being 2021 and the cloud eating the world, the source systems were deployed on the Azure cloud and as such were easily configured to interact with certain services that we designed to transfer the data from the source to the message queue. Specifically, these services were Azure Logic Apps, Azure functions, and finally blob storage.
Azure Logic Apps⌗
The Azure Logic Application service is offered on the Azure cloud and its billed as a “Integration Platform as a Service”, or in slightly different terms, it is a workflow engine used to tie together different Azure services. Some of the pros include the fact that it’s a visual interface (think “no-code”) and the sheer ease of combining a variety of Azure’s cloud services. It is analogous to the Step Functions on AWS.
The purpose of the workflow that we developed on our logic application at a high level is to automatically run the export jobs on the Dynamics application and place the files generated from the jobs on Azure’s storage system. While it was not particularly difficult to create this workflow from a technical perspective as it is a no code solution, there were some tricks and quirks that we learned that are useful to share to the community.
Azure Logic Workflow⌗
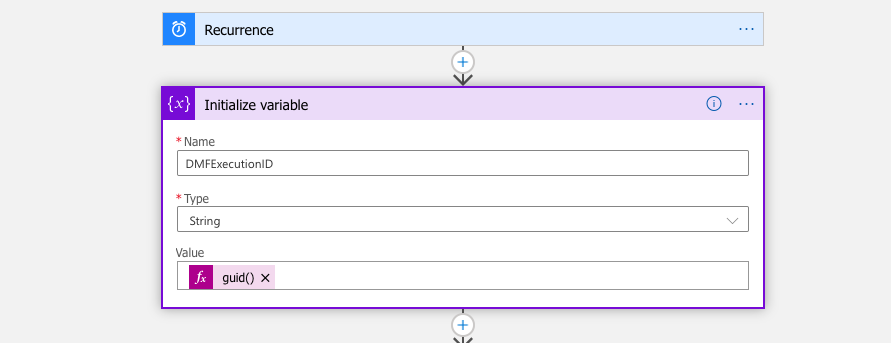
The first part of our particular process was to establish the cadence or scheduling of the logic app. The application offers several configuration options as far as scheduling goes, and for the sake of this guide, I’ll include a screenshot of what it looks like set to run every eight hours (see below)

Now that the recurrence has been set and the schedule configured, the next step is to initialize the variable that the workflow is going to use to represent the export job’s reference ID for each specific run
The step that follows encompass the bulk of activities, and is held within a isolated series of events, in a section called “Scope”
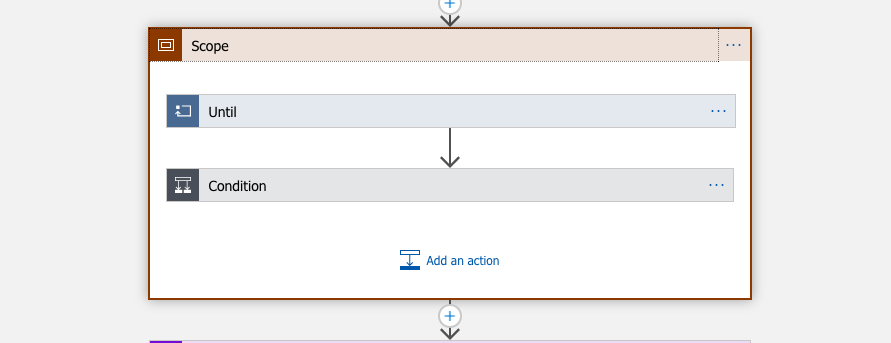
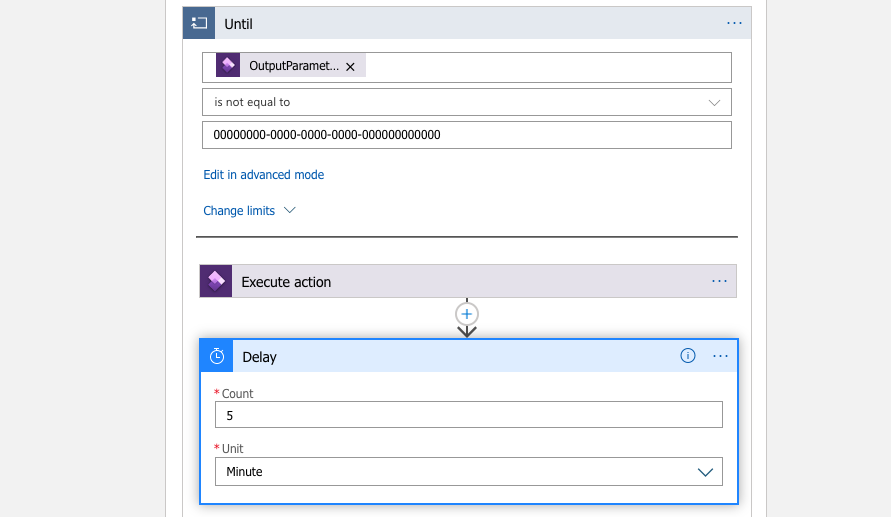
This self-contained block of logic within the scope called “Until” is the segment that runs the export job on Dynamics. This is illustrated below:
The breakdown of these steps is essentially saying until the value that is returned by the “Dynamics Export to Package” job is not that string of zeros (which represents completion or not), then the logic app should run the “Dynamics Export to Package” job. The fields that can be configured for the “Execute Action” substep include the Instance (which Microsoft Dynamics application is this workflow controlling), the Action (in our use case, we were exporting to a data package hence the action shown in the image), the Definition Group ID (the name of the export job running on Dynamics), whether it should re-execute on failure, and the Legal Entity ID.
Once the export job is run, the logic app will then return a value. This value will be used further in the workflow to run other steps. One important thing to note at this stage is that there may be a slight delay in the export job running and the logic app returning the value, so I added a five minute delay in the app following the Export to Package job to give the systems time to align (shown below):
At this point in the workflow, the logic app has triggered the job run and has stored the return value. This return value will be used to validate the next step in the workflow, since it represents the job’s execution ID.
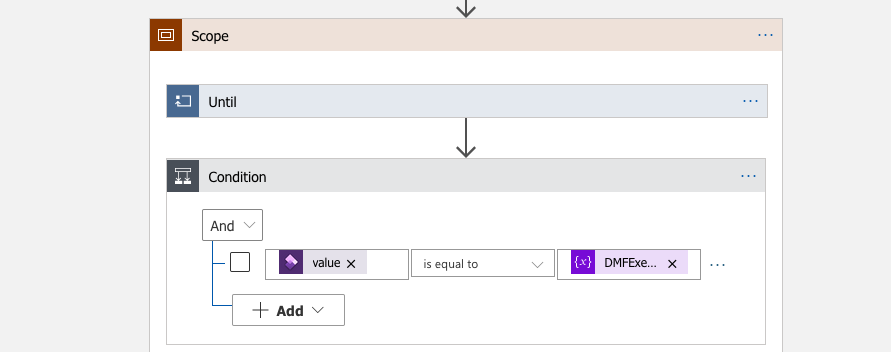
Once the five minutes have passed, the next step of the workflow is set up to take the data files created by the jobs and place them into an Azure blob directory. The first part of this block of logic is a condition that is essentially asking “Is the execution ID that was declared in the beginning of the entire application the same as the value returned by Dynamics after the job was run?” (see below)
If this is False, then we configured the application to send an email notifying our support team that there was a failure in the process (shown below)
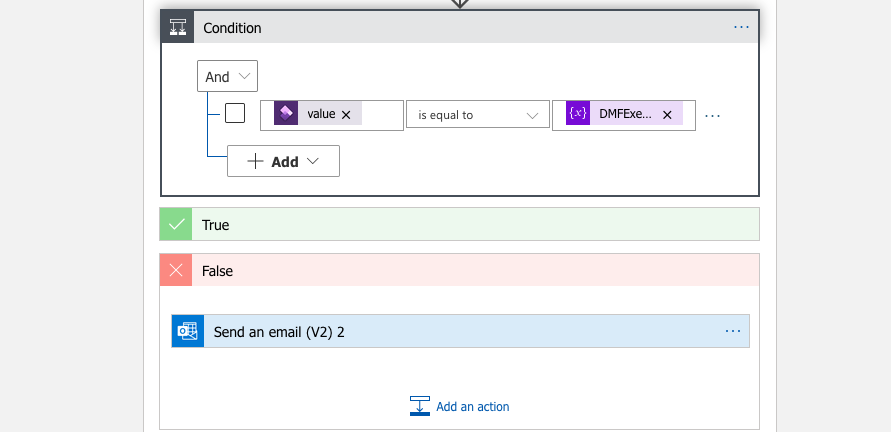
However if this is True (which means the job ran successfully), then there is another isolated block of logic that is responsible for getting the files and placing them in the Azure blob storage.
Within the block of logic that references the True condition, we added another sub-condition as control to the Dynamics operation that would gather the files produced by the earlier Export to Package job. This sub-condition is essentially asking if the Export to Package job succeeded.
If the job succeeds, then the logic app will execute the Dynamics action that gathers the URL of the data package (the result of the job Export job). This URL is used to place the data into Azure blob storage.
After getting the URL, the block of logic adds another sub-condition. This piece of conditional logic is to verify that the URL is https and thus, valid (shown below)
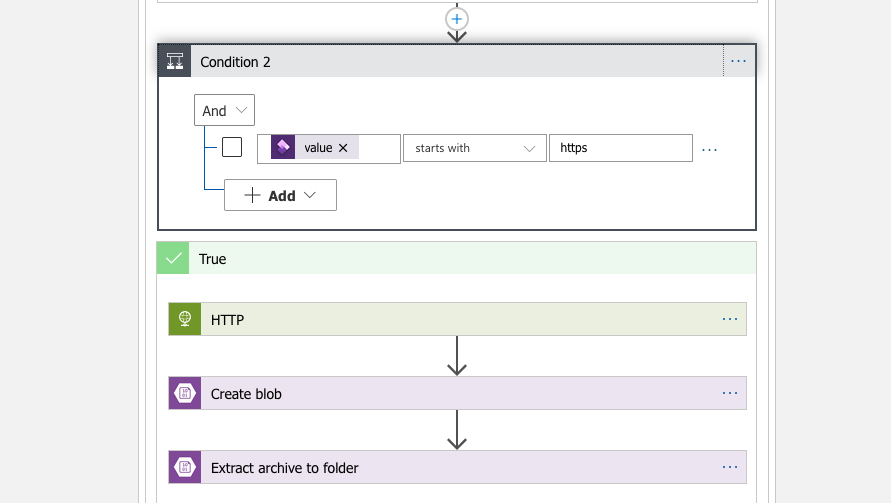
Drilling down into the True section of logic, the HTTP module of the logic app is used to call a ‘GET’ method on the URL.
The HTTP block then gets to create the blob that will store the files. However, here’s one of the quirks of the Azure environment. The files created as part of the Export to Package job are all stored as one blob, which means that they appear as one object on Azure’s storage service. This is quite limiting if you have a job that exports multiple entities and would like to save each entity’s data file as a separate object. The solution to this issue is to add another step after creating the blob to “extract” the files to stand alone blobs (shown below)
Extracting the single blob object (Azure detects it as an archive) to a new directory dumps the individual files into the path that you set.
The Azure Logic App service is quite powerful, and the fact that we could orchestrate an entire data extract process with no lines of code written is a testament to that capability. While there are some odd bits of knowledge needed to get this particular workflow set up, it speaks to the Azure ecosystem that we integrated so many parts of the puzzle so easily. The next section will deal with what the pipeline does with the files after they are dumped into the blob storage service.
Azure Functions⌗
Microsoft’s Azure Functions are the cloud provider’s serverless compute service. For some brief context, most major cloud providers provide a “serverless” offering that allows users the highest level of granularity when it comes to computing. Essentially, serverless computing allows developers to run code without having to provision servers, configure a back-end or hosting solution, or managing runtime. Microsoft’s Azure functions provide this through an event-driven platform that allows for programming in a variety of languages (C#, Java, JavaScript, PowerShell, Python, TypeScript, Other/Go/Rust). This article will show code samples in Python, but we did also experiment with developing custom handlers for Go (our follow up to this guide could include those examples). Serverless code is only billed for the seconds or less of runtime of each function and can be a economically efficient solution for the right use case (code should be stateless, etc). One of the main advantages of Azure Functions is the integrated local environment provided through Microsoft’s Visual Studio Code. You can test, debug, and deploy your function code all in one, well-designed interface. The goal for our function is to get the data from the files in blob storage, transform it, and send it to the messenger queue that feeds into the destination database.
Setting Up Azure Functions on VS Studio Code⌗
If you don’t typically use VS Studio Code, then….well I apologize because this entire section operates under the assumption that you are developing on that IDE. I’m sure there’s other ways to do it, but this guide will not be showing those. This guide also assumes that you have an existing Azure account.
Setting up VS Studio Code is relatively easy. The first step is downloading the Azure Functions extension to your IDE (see below).
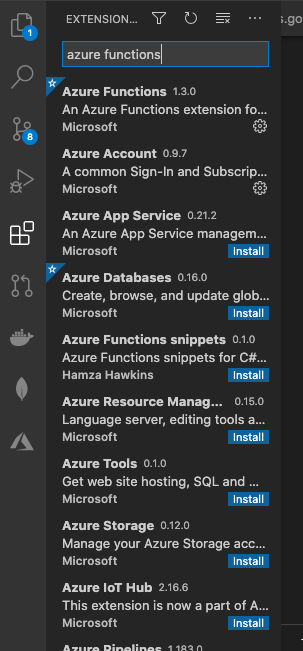
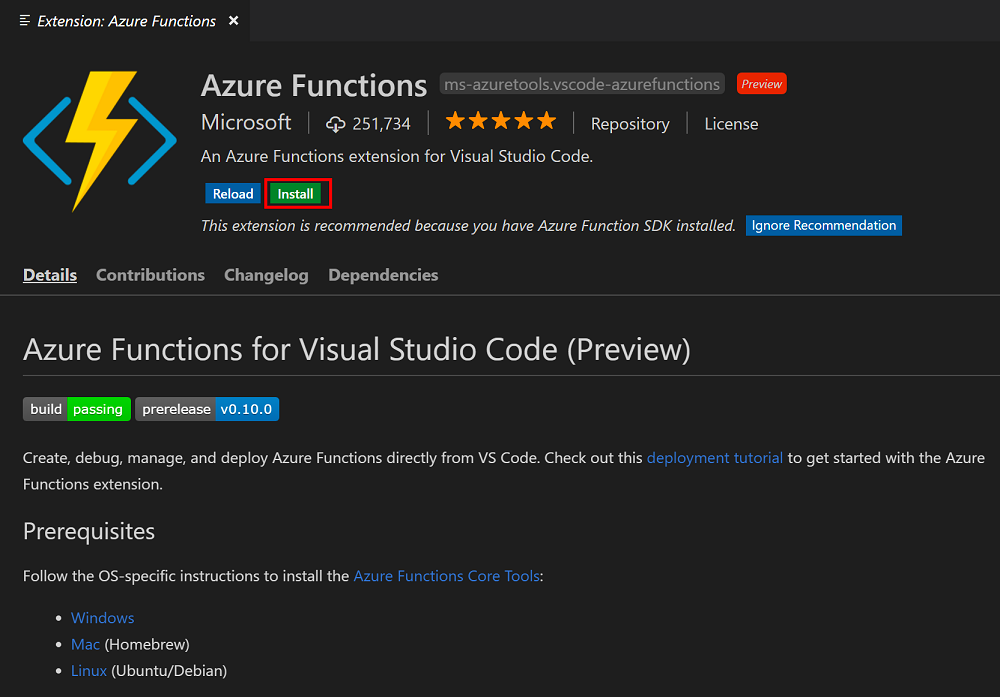
Once the function is installed, you should now see the Azure icon on your side menu (if you don’t see the icon, you may have to close and re-open the VS Studio Code application)
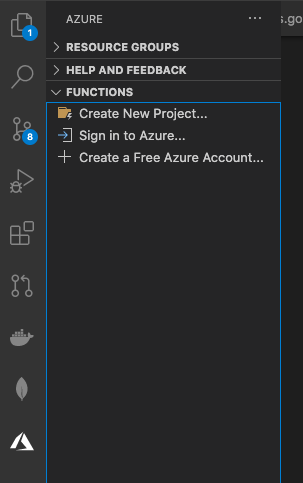
Once the extension is installed, the next step is to “Create New Project”. After you’ve pressed this button, the IDE will present a series of configuration prompts:
- What language do you want to use for the function project (Python)
- What function template (Blob Trigger)
- Level of Authorization (Function)
Once these are set, you should have an Azure Function project ready to edit on your VS Studio Code window with the following generated files
- hosts.json
- local.settings.json
- requirements.txt
- A folder that contains the function.json definition file and __init__.py file for the code
Blob Trigger⌗
In our particular system, we needed our code to run whenever files are dropped into a specific directory. Since this is one of the most common use cases for the Azure Functions, the generated init.py comes with pre-configured code to begin the function. This code includes the pre-configured binding to the blob storage service. The code shown in this section will include some of the pre-configured bindings and some additional ones, which will require changes in various of the files in the projects.
import csv
import sys
import logging
from azure.storage.blob import BlobServiceClient
from azure.storage.blob import BlobClient
from azure.storage.blob import ContainerClient
import azure.functions as func
import pika
import os
import json
import pandas
from reader import Reader
from io import StringIO, BytesIO
import pyxlsb
import openpyxl
import requests

def main (myblob: func.InputStream, msg: func.Out[func.QueueMessage], inputblob: func.InputStream):
    # dblob = myblob
    logging.info(f"Python blob trigger function processed blob \n"
             f"Name: {myblob.name}\n"
             f"Blob Size: {myblob.length} bytes")`
In this initial section of the code, we import all the packages that we need to take the data from the files and send it to the queue. It’s important to note that all packages being imported into the function need to be reflected in the “requirements.txt” file (see screen shot below):
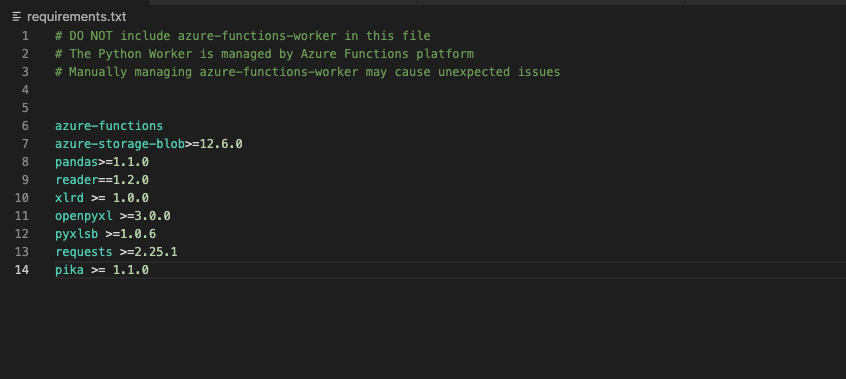
The next part of the project files is the bindings that the function uses. While the template blob trigger comes with the binding for the blob storage trigger, our function also includes bindings for the message that we will be sending to our queue and for data in the blob that is triggering the function run. These bindings are reflected in the “function.json” file of our project
Each binding has certain values that reference the information in the “local.settings.json” file. For example, the field “connection” should reference a value in the “local.settings.json” that provides the connection URL value (see below):

Note: When deploying to production, all the values in the local.settings.json file need to be added as “Application Settings” to the Azure Function configuration in the Function App service
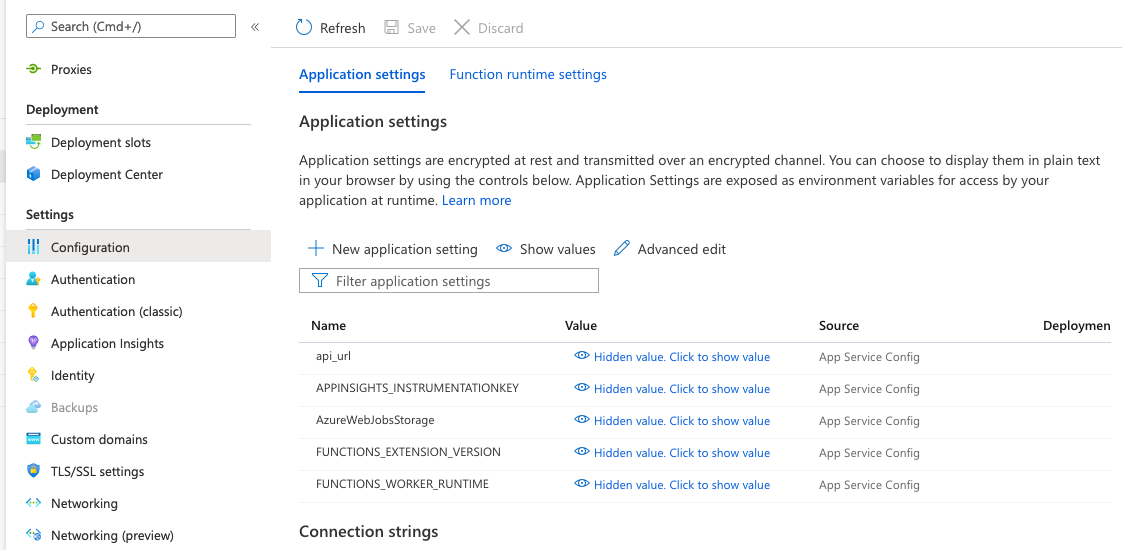
Once your bindings are set, you can now write the logic of the function code. While parts of the function we used in our system are either not relevant to the article or cannot be displayed because of client confidentiality, there are some things I want to highlight that can be useful for most general use cases.
name = myblob.name
    print(name)
    if ".csv" in name:
        #      # Convert blob to json
        conn_str = os.environ['nameofstorageconnectionvariable']
        container = os.environ["nameofcontainernamevariable"]
        blob_name = myblob.name.split("/",1)[-1]
        container_client = ContainerClient.from_connection_string( conn_str=conn_str,
        container_name=container)
        downloaded_blob = container_client.download_blob(blob_name)
        df = pandas.read_csv(StringIO(downloaded_blob.content_as_text()), sep=',', engine="python")
The above lines of code are used to access the content of the file that was uploaded to blob storage and triggered this particular function. The connection string and storage container are stored as environment variables, and need to be set to access the storage service. This produces a container client, which has a method to download the blob object itself. It’s important to note that the blob name should be formatted (I used split), in order to use it to download the blob. If the blob name is not formatted, it can throw an error when trying to use that name to download the blob.
In this use case, the next step in the pipeline is a message queue. To insert the contents of the blob file into the queue, the Azure function needed to transform the downloaded content into JSON. This requires first using the Pandas package to create a dataframe from the blob csv file.
Since I knew the file was going to be a csv, I called the read_csv method. If you’re handling excel files or something similar, pandas has methods that work in the same manner as read_csv. From this dataframe, the function then iterates through the rows and creates batches due to the large data size of certain data entity files. These batches are then transformed into JSON. The final condition determines the contents of the message being sent to the quee based on the file name. Once the JSON is created from the raw file data, it is then dumped into a variable that is sent to the message queue.
        df = pandas.read_csv(StringIO(downloaded_blob.content_as_text()), sep=',', engine="python")

        index = df.index
        rowamount = len(index-1)
        print("Here is the rows count ---------------->", rowamount)

        batchdelimeter = 5000
        line = 0
        x = 1

        if batchdelimeter != 1:
            batchcounter = rowamount//batchdelimeter
            if(rowamount%batchdelimeter) !=0:
                batchcounter = batchcounter + 1
        else:
            batchcounter = rowamount
            x = 0
        print("here is the batch count--------->", batchcounter)
        for batch in range(batchcounter):
            if (batch==batchcounter):
                iter=rowamount
            else:
                iter=(x*batchdelimeter)
            x= x+1
            print("starting with the batch # ---------------->", batch)
            print("the line------->", line)
            print("the iterator------>", iter)
            print("the loc", df.loc[line:iter])
            linerecord = df.loc[line:iter]
            print("ending with the batch  # ---------------->", batch )
            line=iter+1
            lastflag = False
            if batch == (batchcounter - 1):
                lastflag = True
        # for line in range(batch):
            result = linerecord.to_json(orient='records')
            parsed = json.loads(result)
            dumpresults = json.dumps(parsed, indent=4)
            messagebatchcounter = batchcounter
            stringcount = str(messagebatchcounter)
            if "FILENAMECONDITION" in name:
                msg = '{ INSERT JSON HERE }'
                key = "vendor"
            r = requests.post(api_url, data=msg)
Our system sent the variable storing the JSON content to the message queue by calling a post method on an API that we developed in-house.
Conclusion⌗
The bulk of this data pipeline lies in “the middleware” of the system. The Azure Logic App and Functions serverless service combined offer quite a lot of functionality and power across the Azure cloud ecosystem. Being able to integrate workflows across services and have them communicate with one another is a key advantage in the logic apps. On the other hand, the Azure functions provide a level of compute resource granularity that is hard to beat. While the functions service supports a variety of language, the handlers are configured to handle C#, Java, JavaScript, PowerShell, Python, and TypeScript natively. I highly recommend utilizing the VS Studio Code extension for the functions service, as its fully integrated IDE is convenient for local development and testing, and allows you to upload your code to the functions app on the cloud very easily. The next and final part of this case study will break down what happens after the files are sent to storage and the content transformed to JSON.